The Group 11 Operations Room
As the Filter Room Tellers were passing information to the Fighter Command Operations Room, they were also passing it to the 4 Group Operations Rooms. Headquarters required the information for strategic decision-making. Group needed the information to intercept raids. Interceptions were only successful if the response was fast and accurate. Dowding understood that effective response was impossible from the Headquarters level. The organization was too large and too slow to respond. He had to delegate tactical control to the Groups if it was to stand any chance of success.
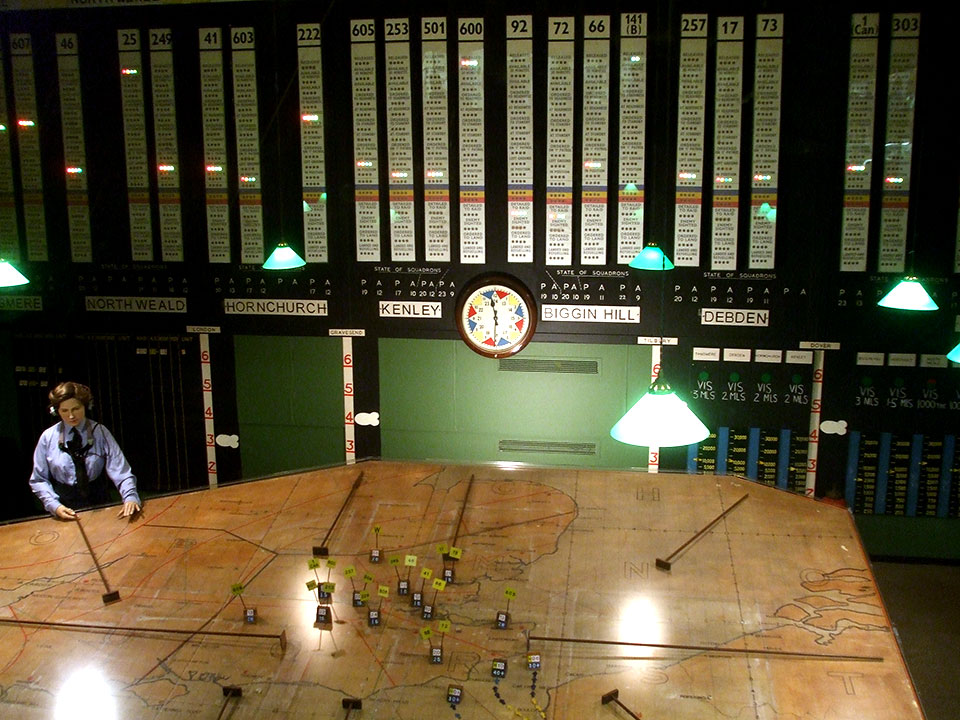
Operations Room Map Table
The Group Operation was filled with a map table that displayed the Group’s area of responsibility. This map included the boundaries and airfields of the Sectors under the Group’s control. The Royal Observer Corps Communication Centers and boundaries were also marked on the map. This was critical to to tracking raid progress once inland as the RDF stations could no longer detect them. The map was marked with the British Modified Grid, like all maps in the Dowding System.
Plotters surrounded the map table, wearing headphones. As they received raid information they placed markers on the map table at the designated coordinates. There were two type of markers: Raid Blocks and Arrows.
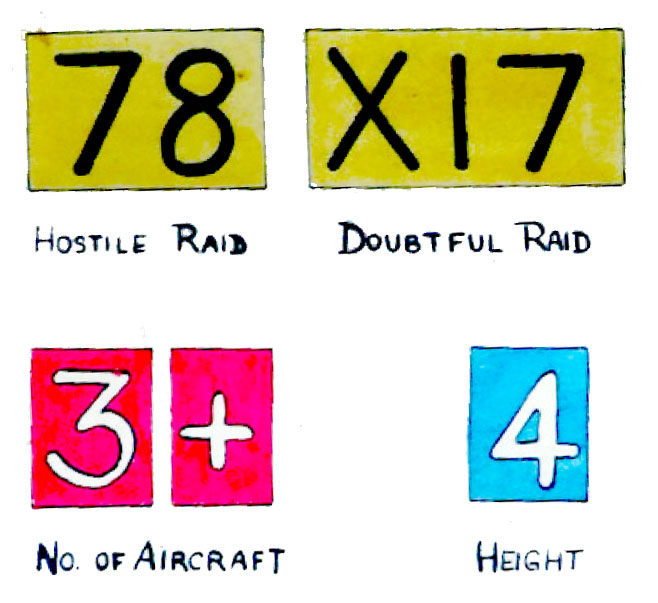
Raid placards planned for use in Group Operations Rooms. In use this scheme was modified.
Raid Blocks displayed raid number, strength, and altitude, encoded using one inch placards. Plotters mounted these placards on a short, angled wood block. As the raid progressed, Plotters moved the raid blocks using long wooden “croupier” rakes.
Arrow markers indicated the direction the raid was traveling. As they were throughout the Dowding System, these markers were used in concert with the Sector Clock to indicate time. There were three colors for the arrow markers: red, yellow, and blue. As the Plotter received the raid position, they would select an arrow marker that matched the color on the Sector Clock. The Plotters also placed and manipulated raid blocks for friendly aircraft. They received this information from the Sector Headquarters, where Plotters and Controllers were tracking the position of RAF fighters. Information in the Dowding System flowed in both directions, ensuring that everyone was using the most up to date information.
Controller
The Group Controller was responsible for anticipating targets, managing resources, and ordering interceptions. Two factors created a need for rapid decisions. The speed of the German raiders and the need for RAF fighters to gain as much altitude as possible. Controllers had to weight these needs while working with delayed and limited information. Every situation required a choice between waiting for more information to clarify the situation and missing an interception.
Controllers also had to assess the developing situation and decide whether the raid was a real threat or a “feint.” Germans often attempted to confound the RAF into launching fighters before the main attack. They intended that these feints would drive the fighters into the air. With their fuel supplies limited, the fighters would eventually have to land and refuel, where the Germans hoped to catch them defenseless. Controllers and Group Commanders had to be familiar with these tactics. For example, Sir Keith Parks, Commander of 11 Group recognized that the Luftwaffe launched feints against Kent 30-40 minutes ahead of every main attack. This insight informed his decisions during the mass attacks against London in September of 1940. As a result, Group Commanders and Controllers found the rapid decision making intense. Withholding fighters as a formation of German raiders approached the coast, was nerve-wracking. What if they were wrong? What if this time it wasn’t a feint?
Tactical control was like a game of chess. Trying to anticipate the opponent’s strategy and determine the most effective defense. Once the Controller determined there was a legitimate threat, he determined his strategy, choosing the squadron that was best suited to make an interception. Their readiness, location, and the composition of the raid forces were critical factors. The Controller would issue orders to the squadron’s Sector Headquarters. Sector would confirm the order and scramble their aircraft. At this point, tactical control passed from Group Operations to Sector Operations.
Tote Board

Tote Board for 92 Squadrons. In this example all 4 flights have sighted the enemy.
At the Group Operations Room, panels called “tote boards” were installed above the map table. These provided a concise picture of the current deployment of the Group’s resources. These tote board were electronic panels with colored lights to show status. Each squadron had a separate tote board mounted on the wall. As the Controller issued orders, an officer would illuminate the appropriate status on the squadron’s panel. There were eighteen status options: 14 labelled and 4 color coded. The colored sections indicated how long the planes had been airborne since the Controller ordered them on patrol. White indicated 15 minutes, red 30, yellow 45, and blue one hour. This gave the Controller insight into when those planes would need to refuel.
Each status had 4 colored lights. Each light corresponded to a different “flight” in the squadron. Each squadron comprised 4 flights: Red, Yellow, Blue, Green. Each flight had 3 planes.