The British survived the Battle of Britain, despite the odds. Although the world does owe much to “The Few,” it was not just the pilots that won the battle. Victory was the result of an improbable project that ACM Hugh Dowding had begun years earlier.
That project was the development of the world’s first integrated air defense system.
Now called the Dowding System, his organization integrated people and technology to detect attacks and coordinate responses. This allowed the RAF to conserve its meager resources. Their fighters would only be launched when German planes were identified. The alternative would have been standing patrols, which were beyond RAF resources. This made the Dowding System a critical invention, as at the start of the Battle of Britain, the RAF was outnumbered 4.5 to 1.
The Dowding System relied on the world’s first RADAR to detect incoming aircraft. Called Radio Direction Finding (RDF), it used radio waves to detect aircraft entering British airspace. An operator located at an RDF station could determine range and bearing of the enemy plane.
Dowding built a network of these stations, called Chain Home, around the coastline of Britain. Each station supporting its neighbors. By the end of the Battle of Britain, 56 stations were in operation.
Each RDF station in the chain passed information from their stations to a central Filter Room at Fighter Command Headquarters. There a specialized team filtered it; turning the raw data into a clear picture of the incoming raids.
After filtering the raid, a Teller in the Filter Room passed the information throughout the system.
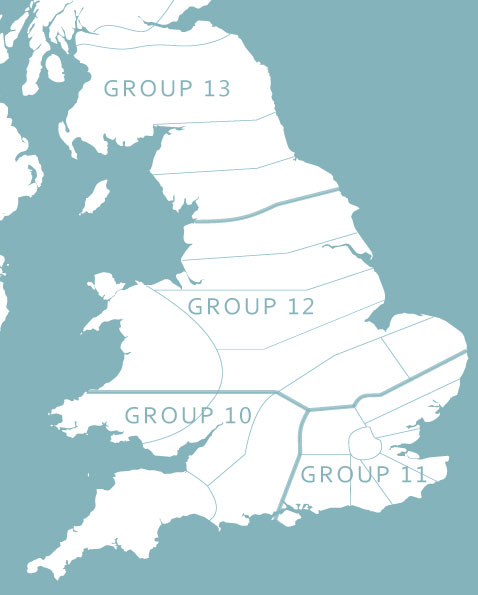
England was divided into 4 geographic Groups. Each Group was divided into Sectors.
There were 4 Groups (10,11,12,13) based on geography. Each Group was divided into several Sectors. Each Sector controlled RAF airfields and their squadrons. The Teller communicated the raid to the both the affected Groups and Sectors simultaneously.
Each Group and all Sectors had an Operations Room, where the raid information was displayed using maps and blocks. Plotters situated around a map table moved the raid blocks across the map as the raid progressed and they received updated information.
Once a raid appeared on a Group Operations Room map table, a Controller would review the situation and decide when and where to “scramble” his squadrons to defend against the incoming raid. This was like chess. The Controller had to intuit the German’s target, decide if it was a real threat or a feint, and order an appropriate response. If he got it wrong, he would waste his precious resources. Once he had determined how to respond he would communicate with the appropriate Sector and order the squadrons into the air.
Once their squadrons were scrambled, the Sector Controllers guided their pilots to an interception with the German planes. This was a difficult technique that relied heavily on experimental technology, called Direction Finding (DF). Once the pilots sighted the enemy raid, they radioed, “Tally Ho!” This was the signal to their Sector Controller that they were engaging the enemy. From this point, they were on their own.
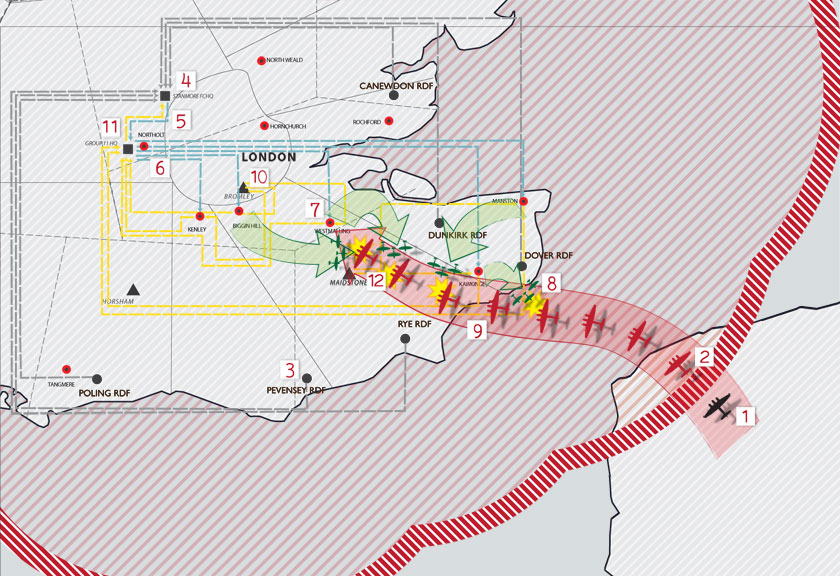
How the Dowding System worked in response to a German Raid
How it Worked: An Example of a German Raid
- A German raid of 20 Ju88 bombers form over France. They turn to cross the English Channel. Their target is London.
- Before the enemy raid leaves France, RDF stations along the English coast detect their approach.
- The RDF operator determines the range and bearing of the enemy raid, and estimates the number of aircraft and altitude. Via telephone, they report this information to the Filter Room.
- In the Filter Room, Plotters receive the incoming RDF raid information and plot it on the large Filter Room map table. The first plots from the raiding Ju88s appear on the table. Within two minutes the Filterer has determined the major course of the raid and placed a raid plaque on the map table.
- The Filter Room teller passes the raid information to the Operations Room at Fighter Command. At the same time they also pass the information to Groups and Sectors in the defense system. Because this raid is crossing into Southern England, Group 11 takes action. Plotters in the Group 11 Operations Room receive the raid information and plot the raids on their map table. The Group 11 Controller watches the raid develop on the map table and assesses the possible targets. He makes a decision on how best to use the forces under his command to intercept the raid.
- The Group Controller orders squadrons to intercept the raid. Group contacts the appropriate Sector Command via telephone.
- Plotters at the Sector Headquarters have been plotting the raid on their map table, so they are prepared when the order comes to scramble squadrons. The Sector Controller orders the airfields to scramble the intercepting squadrons. At the airfields the squadron’s pilots run from their dispersal huts to their aircraft. They take off in groups, attempting to gain as much altitude as possible. Every minute wasted is 2000 feet of altitude lost. Four minutes have passed since the RDF system detected the raid.
- Almost twenty minutes have passed since the Ju88 raid was first detected. The first interception occurs a few miles from the English coast.
- After the initial wave of fighters breaks off to refuel and rearm, the raiders continue to the target. As they cross the coast, they are no longer visible to the RDF stations. Now, the Royal Observer Corp must track the raiders’ progress as they cross the English countryside.
- The Observer Corps handles responsibility for tracking the raid’s course and altitude. Observers staff posts established throughout the countryside. As the enemy craft cross overhead, the observers use simple tools to determine its altitude and direction. The observers convert this information into a reference using the British Modified Grid system. They communicate the information to their respective Observer Corps Headquarters. From the Headquarters, liaison personnel pass the information to the relevant Sector Headquarters. The tellers also pass the raid information to Group Headquarters.
- Plotters at the Sectors and Group Headquarters receive the information from the Sector Headquarters and update the raid information on the map table. Tellers also communicate the update to Fighter Command Headquarters.
- Vectored by their Sector Headquarters, additional waves of fighters attack the raiders. The German raiders face constant opposition on their way to the target.